Packaging a SCORM Course

In the last lesson we briefly covered how to test SCORM courses. If you’d like to test a course in an LMS, you’ll need to package the course, so let’s take a moment to discuss packaging.
Packaging SCORM 1.2 Courses
A SCORM package normally consists of:
- A SCORM manifest (the imsmanifest.xml file) at the root of the package
- Supporting XML schema files
- Your course content
By spec, a SCORM course needs to be packaged in a Package Interchange Format (PIF) file, which is really just a plain old ZIP archive but with a PIF file extension instead of ZIP. In reality, most learning management systems accept ZIP files, so don’t worry about using the PIF extension.
Manifest
First, a little background on SCORM manifests. A SCORM manifest is just an XML file containing a specific set of nodes. These nodes provide details about your course, including title, version number, and location of course files (hence the name ‘manifest’, like a ship’s manifest). When the course package is imported into the LMS, the LMS analyzes the manifest, grabbing the course’s metadata and determining which HTML file should be used as the start page for the course.
As I explained earlier, the authors of SCORM had a grand vision of what SCORM could be, but a number of concepts in that vision never really panned out. As with the CMI data model, the SCORM manifest system was designed to support many intriguing options, including nested SCOs (a SCORM course within a SCORM course), standardizing how courses navigate between course pages, and roll-up rules that impact how a course is considered completed. And, like the CMI data model, most LMSs don’t uniformly support the full feature set.
SCORM documentation includes an entire book devoted to the manifest (“SCORM Content Aggregation Model”), which illustrates just how convoluted a manifest can become.
SCORM 1.2 listed many features as optional and left it up to the vendor to decide whether or not to implement the feature. As you can imagine, many vendors opted not to implement features, which caused headaches for developers who wanted to use the features.
With the release of SCORM 2004, the ADL set out to correct this issue by requiring all features to be implemented by LMS vendors. Coincidentally, SCORM 2004 also introduced many new sequencing and navigation options, making a SCORM 2004 implementation much more complex and expensive to implement than SCORM 1.2. As a result, some vendors complied with the new ADL requirements, but many did not, due to the complexity and cost of implementation.
This caused a chicken-or-egg scenario: E-learning authoring tools did not utilize any manifest features beyond the bare minimum because most LMSs did not support them. LMS vendors were quick to point out they didn’t need to support ‘advanced’ features because most e-learning authoring tools weren’t utilizing them.
I waited for years to see if LMS vendors would begin supporting the full feature set, as required by SCORM 2004’s stricter conformance rules. In the meantime, I followed the same path as the commercial vendors — for the sake of being ‘bulletproof’, I kept it simple, and it served me well. Two decades later, it’s safe to say most LMS vendors will never implement the full feature set, and I wholeheartedly recommend keeping your manifest as barebones as possible.
Also note: Using the LMS’s built-in course navigation (next, previous, table of contents, etc.) means your course UI (and therefore your learners’ experience) will be inconsistent from LMS to LMS. Using your own navigation system ensures your course will look and behave as expected, regardless of which LMS it has been loaded in.
Manifest Template
To help streamline my development workflow, I created a SCORM packaging template that covers the bare minimum required by SCORM. This template includes the manifest and the supporting XML schema files. To use this template for a new course, just copy the manifest and the SCORM-schemas folder to the root of your new course project, then edit a few details in the imsmanifest.xml file: course title, course version, course ID, and organization name.
You don’t need to understand everything going on here; all you need to do is change the values I’ve highlighted below to match your course.
<?xml version="1.0" standalone="no" ?>
<manifest identifier="CourseIDHere" version="1"
         xmlns="http://www.imsproject.org/xsd/imscp_rootv1p1p2"
         xmlns:adlcp="http://www.adlnet.org/xsd/adlcp_rootv1p2"
         xmlns:xsi="http://www.w3.org/2001/XMLSchema-instance"
         xsi:schemaLocation="http://www.imsproject.org/xsd/imscp_rootv1p1p2 SCORM-schemas/imscp_rootv1p1p2.xsd
                             http://www.imsglobal.org/xsd/imsmd_rootv1p2p1 SCORM-schemas/imsmd_rootv1p2p1.xsd
                             http://www.adlnet.org/xsd/adlcp_rootv1p2 SCORM-schemas/adlcp_rootv1p2.xsd">
  <metadata>
    <schema>ADL SCORM</schema>
    <schemaversion>1.2</schemaversion>
  </metadata>
  <organizations default="course-code-here">
    <organization identifier="course-code-here">
      <title>Course Title here</title>
      <item identifier="item_1" identifierref="resource_1">
        <title>Course Title here</title>
      </item>
    </organization>
  </organizations>
  <resources>
    <resource identifier="resource_1" type="webcontent" adlcp:scormtype="sco" href="content/index.html">
      <file href="content/index.html" />
    </resource>
  </resources>
</manifest>- Manifest identifier: This is your course’s ID. It needs to begin with a letter, and cannot contain spaces or special characters (hyphens and underscores are allowed).
- Manifest version: This is the version number for your course. In my experience, it doesn’t really matter what number you provide here, it’s largely for your own benefit.
- Organizations default: Many LMSs will use whatever you put here as the course code displayed in the LMS. Like the manifest identifier, it needs to begin with a letter, and cannot contain spaces or special characters (hyphens and underscores are allowed).
- Organizations identifier: I usually just mirror the value I provide under organizations default.
- Organization title: The title of your course.
- Item title: The title of your course (again).
And that’s it! Really simple, nothing to be afraid of.
You may have noticed there are two references to index.html. These are pointers to your course’s launch file — the file the LMS will open when the learner launches your course. If your course’s root HTML file ever has a filename other than index.html, you’d need to change these values to match. My courses are always set to use index.html, so I never need to edit these values.
You may also have noticed a few fields are redundant, such as two <title> elements. Why the redundancy? Without getting into the weeds, the SCORM manifest is designed to handle a variety of complex course configurations, including courses comprised of multiple SCORM packages (commonly known as multi-SCO courses). Since we are not using any of these advanced features, we end up with a streamlined manifest that has a couple of redundant fields.
A word about the resources node
By spec, every course asset contained in the ZIP file is supposed to be listed within the <resources> node as either a “sco” (the course’s primary launch file) or “asset” (any supporting file, including images, scripts, HTML, etc.). For example:
<resources>
    <resource identifier="resource_1" type="webcontent" adlcp:scormtype="sco" href="index.html">
        <file href="index.html" />
    </resource>
    <resource identifier="resource_2" type="webcontent" adlcp:scormtype="asset" href="page2.html">
        <file href="page2.html" />
    </resource>
    <resource identifier="resource_3" type="webcontent" adlcp:scormtype="asset" href="myscripts.js">
        <file href="myscripts.js" />
    </resource>
    <resource identifier="resource_4" type="webcontent" adlcp:scormtype="asset" href="mystyles.css">
        <file href="mystyles.css" />
    </resource>
    <resource identifier="resource_5" type="webcontent" adlcp:scormtype="asset" href="mypicture.jpg">
        <file href="mypicture.jpg" />
    </resource>
</resources>
As you can imagine, this is a major pain to deal with. Thankfully, most LMSs do not analyze the manifest’s nodes for anything apart from the adlcp:scormtype=”sco” file, which is used to launch the course. It’s usually safe to ignore the resource nodes.
However, some LMSs do use the <resource> nodes as a true manifest of goods (a list of everything the LMS will be needing to support the course) and will delete any files in your ZIP that are not listed in the manifest. This is rare but possible.
If you encounter this issue, there are a few open-source SCORM packaging tools floating around that you might find useful. You can also write a script that analyzes your course folder and writes up a list of files for you. I’ve posted an AppleScript demonstrating this technique on GitHub.
Zipping it up
As explained earlier, a SCORM package is a glorified ZIP archive. Once your content and manifest are settled, you’ll need to zip up the files.
It’s very important to leave the imsmanifest.xml file at the root of the ZIP file. If you don’t, the LMS will throw an error when you import your package. If you follow my technique for organizing files, your end result will look like this:

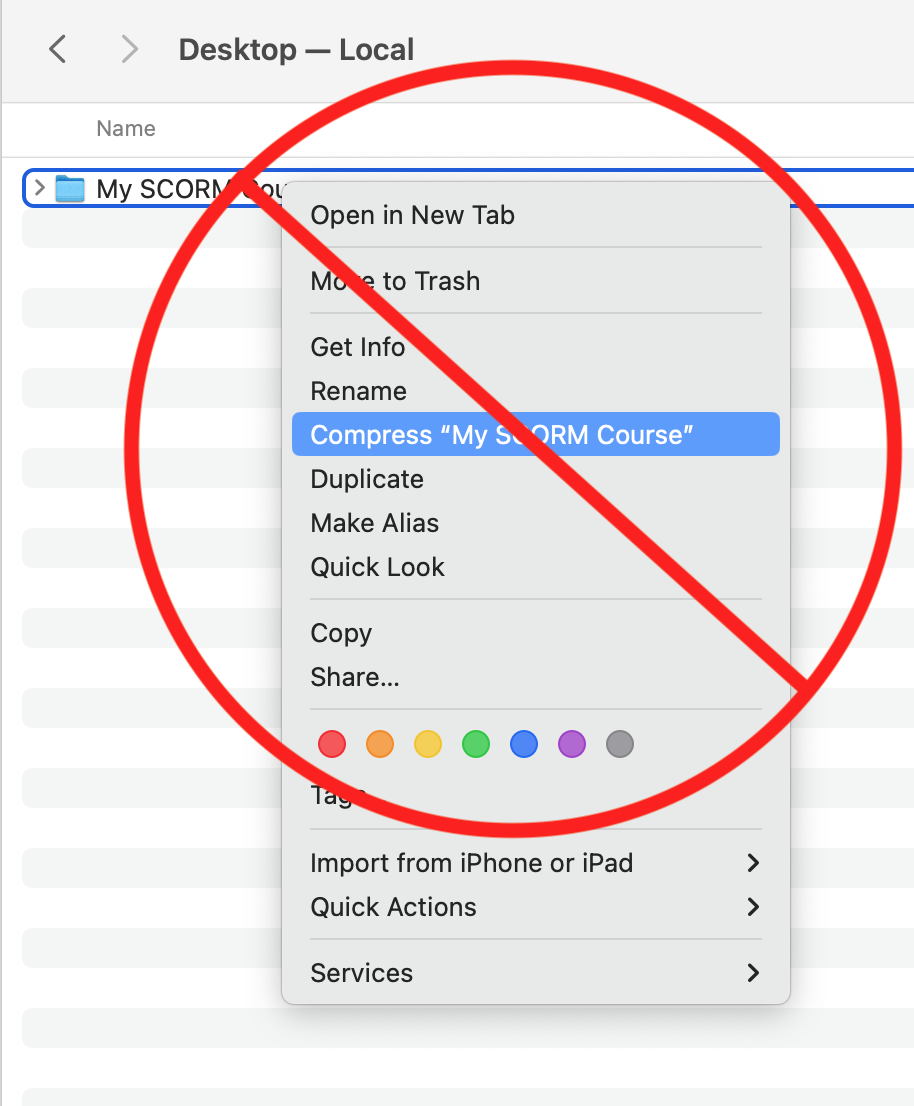
On a Mac, create the ZIP by selecting the files and right-clicking. Select “Compress”.
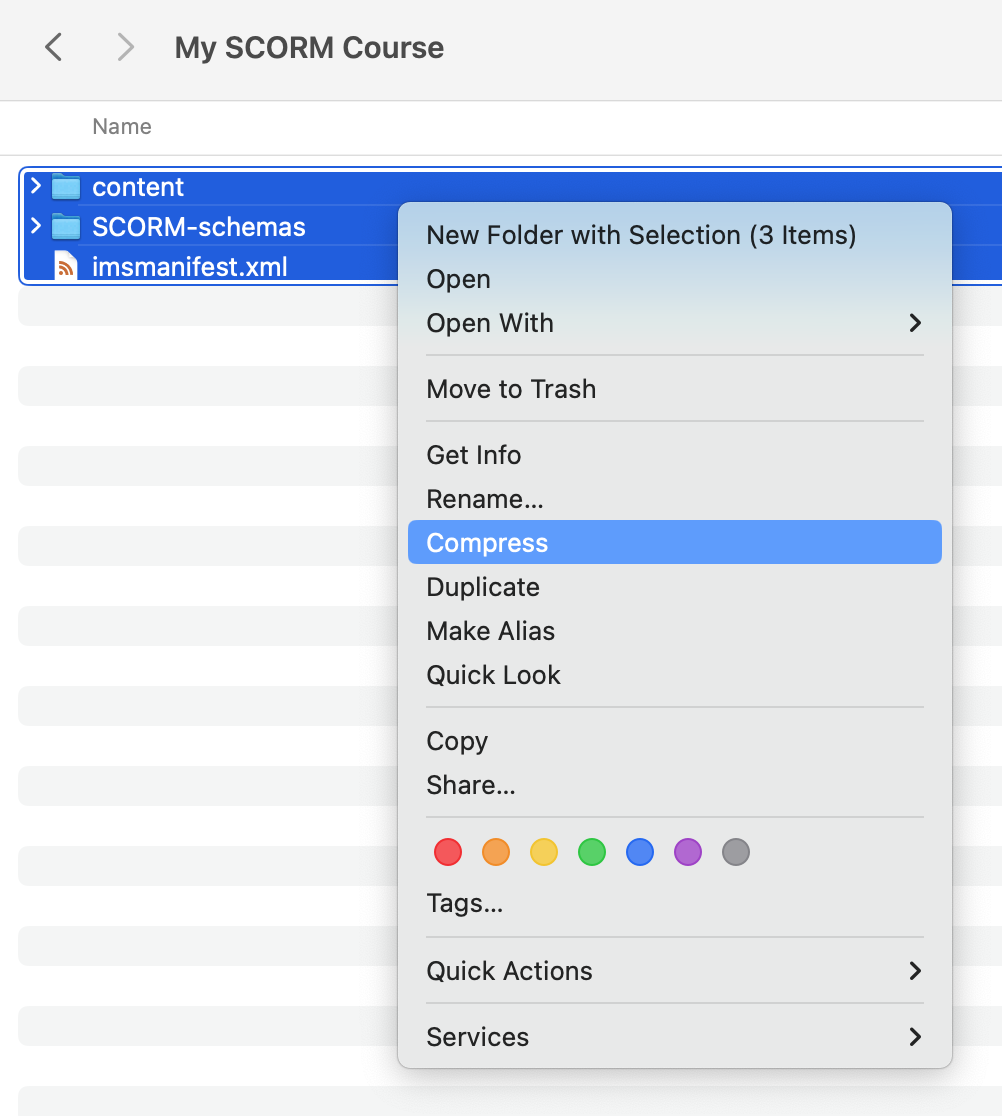
After zipping the folder, unzip it and ensure the resulting folder looks like the first image above.
Don’t try to compress the parent folder, this will lead to incorrectly nested files. The LMS will not be able to find the manifest and will give you an error.